Cameron Conover Cameron Conover

Making the most of your ShiftX3

As racing season picks up I wanted to share with you some tips about how to improve your experience with the ShiftX3 Sequential shift light. ShiftX3 To that end I made this short video to better explain the functions of some of the items in the Lua Script that controls ShiftX3

That video covers some of the features associated with how the ShiftX3 graphically represents the RPM that your engine is at. There are many other adjustable features including the colors of the lights, gear ratios that the gear indicator displays, and functions of the buttons. You can find all of the details for ShiftX3 here on Autosport Labs’ Wiki page: ShiftX3 Wiki. Please leave a comment below if you have any specific questions or would like to see a how to video associated with another aspect of ShiftX3 or another product available at RaceConover.com

Read More
Cameron Conover Cameron Conover

Shopping List

The plug and Play harness system has made installing RaceCapture easier than ever. However there are now an overwhelming number of new products to facilitate this. Here I’ve shared some information for customers trying to navigate this new landscape that should hopefully make it a bit easier to reach your destination.

Here is as list of parts with a brief description. Please let me know if you have any questions.

Start with the RaceCapture Pro mk4:

https://www.raceconover.com/shop/racecapturepro

RaceCapture Pro comes with a Power + CAN lead to get it powered up as well as the GPS antenna. But you will need some other harness parts in order to access the digital and analog sensor ports on the unit.

First for the RPM signal it needs to be wired into the connector labeled "Digital" on the RaceCapture, this is where the 4 timer/RPM channels are as well as the 4 GPIO channels, since you will be wiring that to the diag port on the miata, I would just suggest to use an 8 channel pigtail for that, which is this part:

https://www.raceconover.com/shop/8-channel-analogdigital-sensor-pigtail

Next you need Access to the "Analog" connector which is the same type of connector as the above pigtail matches, so you could use another one of those, but there is a cleaner way. I would start with the 8 to 4 splitter which splits the 8 channel connector down to two four channel connectors.

https://www.raceconover.com/shop/8-to-4-channel-sensor-splitter

Now depending on how many brake pressure channels you want you can probably get away with one quad sensor splitter which would plug into one of the leads on the above harness.

https://www.raceconover.com/shop/quad-analogdigital-sensor-splitter

Now you have access to 4 individual analog sensor inputs, if you want more than four sensors, perhaps a front and rear brake pressure, you would need two of the above. To this you can plug your sensors directly in.

Temperature sensor (two of these one for oil and the other for coolant): https://www.raceconover.com/shop/linear-temperature-sensor-with-plug-and-play-harness

Brake Pressure Sensor: https://www.raceconover.com/shop/150-bar-2175-psi-pressure-sensor-with-plug-and-play-harness

And then to wire into the TPS or tap the TPS signal you would just want an analog sensor pigtail like this: https://www.raceconover.com/shop/analogdigital-sensor-pigtail

You can buy various length sensor extensions to go between the quad splitter and your sensors if needed, they are found here: https://www.raceconover.com/shop/sensor-extension-cable

Now for TireX, the tire temperature sensor network, that runs on the CAN bus, so you would need to access the CAN 1 CAN 2 Connector on the RaceCapture Pro4. First you need to separate out CAN 1 from CAN 2 with this: https://www.raceconover.com/shop/can1can2-dual-can-splitter

To that you can wire in TireX with the TireX plug and play harness, I would suggest connecting TIreX to CAN2 because that is the default for the preset in the software.

TireX: https://www.raceconover.com/shop/tirex

TireX plug and play harness: https://www.raceconover.com/shop/tirex-4-corner-plug-and-play-harness

You can also add in ShiftX3 to that same CAN bus if you wish, ShiftX3 is found here, great little sequential shift light: https://www.raceconover.com/shop/shiftx3

If you wish to order a PiDash you can purchase that here: https://www.raceconover.com/shop/pidash

PiDash Currently requires you to send in a raspberry pi to our shop address found below on the website.

That should do it, please let me know if you have any questions, thank you!


Read More
07K Cameron Conover 07K Cameron Conover

Racing a MK5 Rabbit, AC Compressor

There Are A Few Options For Deleting The AC Compressor, But Are They Worth The Cost?

There are a few options for deleting the AC compressor, but are they worth the cost?

If you have already checked out the Drive Belt article here, you know that there’s no good way around having the AC compressor pulley in place. Something is going to have to be in its place to facilitate the drive belt for the water pump and the alternator. There are three options, do nothing and run a stock AC compressor, gut the stock AC compressor and lighten it, and finally buy an aftermarket pulley and either use the factory CCTA delete bracket or an aftermarket billet bracket. Let’s explore the pros and cons of each.

If you do nothing at all you will be fine, but you will be giving up some horsepower to rotating mass. The factory compressor has 5lbs of rotating mass, that is significant. In the world of racing rotating mass is critical, every bit you remove frees up power and improves throttle response and acceleration. You also will have a 12.5Lb thing hanging out way out on the front of the ahead of the front axle, getting rid of some of that mass out on the end of the car will not only improve acceleration by weight reduction, but it’s weight that is in a really bad location, especially on an understeer prone FWD car. This option is workable, but not ideal.

Gutting the factory compressor is a really good option in my opinion, it is very cost effective, and something that I think you will want to do even if you decide to replace the stock parts with aftermarket bits, you can retain your factory compressor as a spare in case of failure during an event. Cost wise it’s nothing but time. If you have a running 2.5L 07K engine you have a servicable AC compressor already, cost is zero. If your AC compressor is broken or damaged, you can get a replacement used unit from a salvage yard for about $70. It took me a total of 2 hours to get my AC compressor to this point.

07K, Air Conditioning Compressor, Gutted AC Compressor, AC delete pulley

This is basic weight reduction, just using a step drill, an air saw, and a sander and cleaning out all of the shavings.

I’m going to follow up in a bit with a more aggressive weight reduction effort to see just how light we can get it, and I’ll mount that on my car and race with it to prove it’s worthiness. The following video shows a how to of what steps I took to get down to that weight. If you are interested in doing this, it’s worth a view, I share step by step procedures as well as required tools and final results.

The above video shows what you can accomplish for free. You cut the rotating mass in half from 5Lbs. to 2.5Lbs. And with just a bit of extra time you are able to reduce the overall weight of the unit from 12.5 to 6.9 Pounds, almost in half again. I’ll let you know how light I get it with another hour or two of time.

The final option is spending money. The cost of aftermarket parts is around $360. The AC delete bracket from the factory is about $150 and an aftermarket billet aluminum pulley is another $160. I have been told that the total weight of this is 2Lbs, but I have not verified that. I would love to hear from someone who has one what the total weight is, with fasteners, and then also, the weight of only the pulley itself. I’m sure this is a fine option, the biggest problem is cost. And if you want equivalent parts in the kit for spares you have to double that. The other thing that I have heard is that the bracket can be kind of fragile, so if you are following my drive belt recommendations of removing the tensioner and tensioning the belt as you install the compressor or delete bracket, you need to be very careful not to put too much leverage or force on the back bolt area or you could break the factory delete bracket. The billet aftermarket bracket is probably less of a concern as that part looks somewhat over-built. If you have either of the aftermarket solutions, please let me know if you weigh them, I would love to be able to add a weight comparison. Is 4lbs of weight and 1.5Lbs of rotating mass worth $360 to you? It might be. But, if you are just starting out with the car, I’d say it’s not likely that this $360 is going to make you faster. The money is better spent on track time or tires. When you think you’ve sharpened your program to the point that you are searching for every sliver of weight from the car, go for it, spend the money. But, I think you will still want to gut the factory unit, because you need to have spare parts on hand in case of failure. We know that the factory bearing and compressor are capable of many thousands of miles on the road and hundreds of hours on track, but the aftermarket units don’t have a proven record yet. Did they select a bearing that is capable of long life under these conditions? We don’t really know yet.

Thanks for stopping by! See you at the race track!

Read More
Cameron Conover Cameron Conover

The Process, Part 3 the Cage
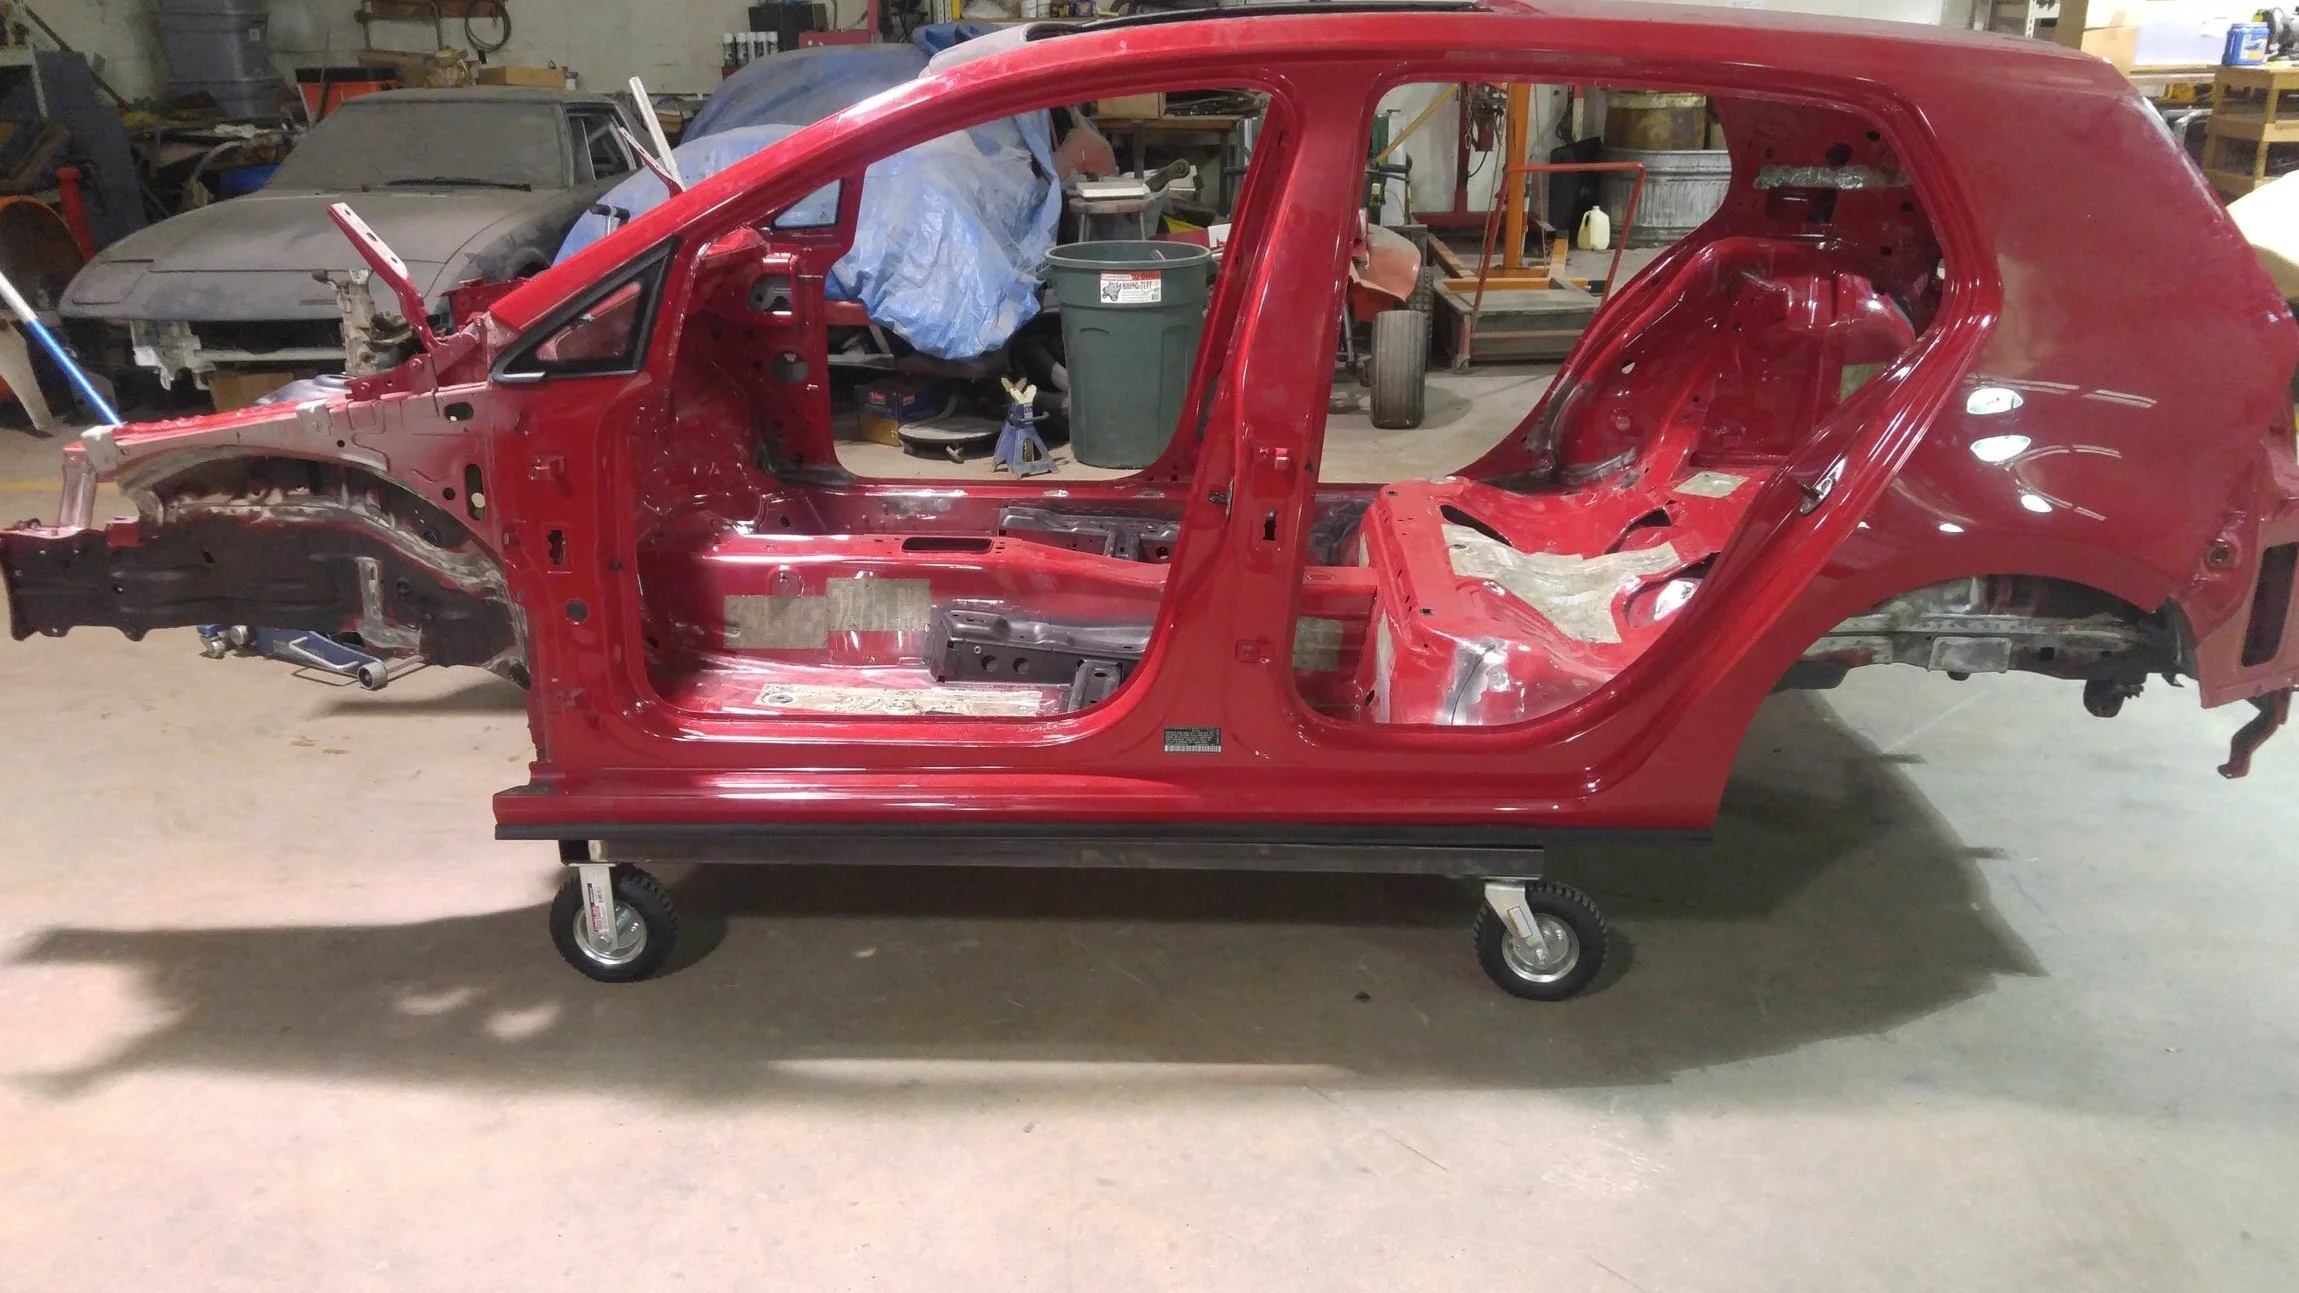
Are you excited? This is the part where we finally start making something that looks race car-ish. I’m also going to let you buy some things at this point, but still not “go fast” parts. Building the cage is another step where we need to know where we are going. Different classes and different organizations have different regulations with respect to roll cages. Typically your basic minimum roll cage will be compliant across most organizations, however adding on complexity above and beyond the minimum is not always legal. There are what we call cage tie-in points, or just “points.” When you hear someone mention a 6 point cage or an 8 point cage what they are talking about is in how many places the cage is welded to or attached to the original car. The minimum you will find is a 6 point cage this would be two rear down tubes attached at the rear wheel wells usually, two main hoop tubes attached right behind the driver to the floor, and then two down tubes attached to the floor in the front of the car. However, I am not aware of any classes that limit you to only 6 these days, most allow two more attachments from the front down tubes to the firewall area. That would be an 8 point cage. The rules for your class come in when you want to go above and beyond that. Often times people want to go through the firewall to the strut tops to stiffen up the chassis, in many classes this is not allowed, you could spend a lot of money adding in these extra attachment points and at the same time knock yourself out of a class that you want to run in.

2012-02-17_19-23-58_171.jpg

Yes, yes, I said I was going to let you spend money on “parts.” Okay, let’s talk about it. You will want to have picked out your race seat before you have the cage built. The reason for this is because often times the cage can intrude on the space you need for you seat, especially in tight cars. Your cage builder needs to know what seat you are going with, and a close approximation of where you will want it mounted. You should also talk to your cage builder about how you will mount the seat itself. More on that shortly. Other parts that would be smart to consider at this time are your harnesses, and any nets that you will run inside the car.

A sparco full containment fiberglass shell racing seat.

A sparco full containment fiberglass shell racing seat.

Now, let’s talk about safety equipment a little bit. This is no place to cut corners or slash the budget. You can replace a car, but you can not replace a you. I always recommend going with a full containment FIA style seat for a road racing car. And you’ll want the associated seat mounts that go with it. I would also recommend using head containment nets along with your window net. This adds some complexity and expense, but it’s about keeping your head mounted on top of your neck, and your neck in one piece. So you have the FIA seat mounted to the style of bracket it was designed for, and then we add in the head containment nets. THESE NETS SHOULD BE WRAPPED AROUND THE SEAT. It is not useful to have a head containment net that does not fully contact the seat, a net flapping in the breeze mounted in the center of the car touching nothing is not capable of doing it’s job. Read the instructions and follow them.

schroth-race-net-side-nets-display-install.jpg

On this note, let’s talk a little bit about the contrast between what we see in road course racing and what we see in circle-track racing like NASCAR. a NASCAR style seat is a rigidly mounted seat that is attached to the cage in several points, it’s a solid aluminum or carbon composite piece that does not flex or give. They are large, very large, because they have to have multiple inches of energy dissipating foam inside them. Because the seat is so solidly mounted a lot of the crash energy is transferred right into the seat shell, so in order to protect the driver’s body we have to have 4 or 5 inches of foam around the driver. This is not something that can be easily accomplished or even needs to be easily accomplished in most road racing cars. Our crashes are different, very rarely does a road race car hit a solid concrete wall, and if it does it’s rarely at the same speeds that you see in NASCAR. Most of our crashes in road racing will have lots of opportunity to scrub off energy in little bits along the way, rather than one huge whack. The FIA seat and it’s mounts along with the properly installed head containment nets, are designed to flex and move around during a crash. Most of them are flexible carbon or fiberglass, and they are mounted on seat brackets that are designed to deflect and bend so that the energy doesn’t reach the driver’s body. So you want as much empty space around the seat as you can find, and you want to follow the manufacturer’s instructions on seat mounting, do not try to outsmart these guys, and don’t let your circle-track buddy give you a hard time about it, it’s apples and oranges.

Okay, so back to the cage again. We have our seat, and we are going to the cage shop. Talk to your cage builder about how the seat will be mounted. I highly recommend having the cage builder assist in this process. I would remove all the factory seat mounting, podiums and boxes and what not, and build your own mount. I prefer, and I recommend building a little mini cage for the seat mount that exists on it’s own. Plate 4 places along the sides of the seat area, two on the center tunnel and two on the side sill/rocker area. Then between each of those weld in a cross bar that goes from left to right between the pads, and once you have that. Weld on two rails that go fore and aft to those cross bars. This gives you a solid seat mount that is not reliant on a floor pan for structural integrity. I believe this is one of the most overlooked areas in amateur road racing. People mount their seats on garbage. If you absolutely must mount the seat to the floor, please please reinforce the area somehow.

The seat mount in my car, Hector, after I welded it in.

The seat mount in my car, Hector, after I welded it in.

I have built a lot of race cars in my day. I don’t know how many, a bunch, mostly for other people. I have never built a complete cage. I have modified cages when they don’t suit me or a client, but I’m not a cage builder. There is no economy in building one cage for yourself. You will spend so much time trying to figure it out and still probably do a poor job of it, no offense. Have a trusted cage builder do your cage. I know several great cage builders on the east coast. There are three in my immediate area that I trust, and more in the mid atlantic and south east. Plenty of accomplished people who know what they are doing. Don’t try to save money on this, just don’t do it. Budget about $2000-$3500 for yourself and you will get a beautiful, legal, and safe cage that will make you proud when people peer into your car in the paddock. Within that range you can get on the low end your basic minimum requirement MIG welded cage up to on the high end a TIG welded cage with fancy gussets and so on. There is nothing wrong with a MIG welded cage, by the way, most cages are mig welded. It’s not as pretty, but it is perfectly safe.

CageTCar.jpg

This is another place where you may want to look around at some cages and see what styles you like and compare what you see with the rules for your class and etc. Most professional racing series allow very complex cages that are tied into multiple points on the chassis and incorporate fancy finish panels, gussets, and lots of dimple die work. Often times most of that stuff will not be legal in an amateur level club racing class. So shop around, but don’t forget to pay attention to what you are allowed.

Top Quality builds always include a nice finish on the interior of the car.

Top Quality builds always include a nice finish on the interior of the car.

Depending on how busy the cage shop is, and how well you planned your delivery and etc. the car will probably be with the cage builder for a number of weeks. This is the perfect time to get some other work done. Next time we’ll discuss what can be done while the chassis is away at the cage builder.

Read More
Cameron Conover Cameron Conover

The Process, Part 2

Okay, so we have decided on the car and we know which class or classes we want to run, and we know what’s legal and what isn’t, right? So now can we please start the shopping spree? Well, no, not yet.

It’s time to really start looking at the car we have, our subject. Have you decided on an older car, something classic perhaps, or do you want to go with something newer? Either way you need to do a full evaluation of the car and what it really needs to be a safe and reliable car first. Safety and reliability are going to be your two most important outcomes from your build. The reason for that is that, again, the part that will slow you down the most is between your ears. Having confidence in the safety of the car will make you a more confident driver, and having a reliable car will allow you to spend time learning to drive it rather than trying to figure out why there is oil all over everything or why magic smoke is wisping out from under your dashboard.

intaft.jpg

If you have a newer car as your starting point you won’t need to worry too much about rust and body damage, but if the car is older you definately want to look for these things. Rust can weaken the structure of the car and render it useless in it’s worst cases and in other cases it can at a minimum create more expense to patch holes and create more work for your cage builder or fab guy. So look for these things and be ready to address them.

1117151806.jpg

You also need to decide just how gung-ho you are on this build. When I am building a car for a client I always advocate for a complete disassembly. This means down to the tub, engine out, subframes off, suspension completely off, all interior panels and wiring completely out of the car. This is part of what I call preparing the chassis. Chassis prep can include rust-repair, undercoating removal, seam sealer and noise deadening removal, and patching unwanted holes in the floor or firewall areas. All of these things are easiest to perform before the cage is built. One thing you will quickly realize about roll cages is that not only are they 100% necessary for safety and a critical part of the car’s design in terms of rigidity, but they also just flat get in the way all the time.

So, before the car goes to hard-fab for a cage installation, you need to do the chassis prep. You need to decide what you are going to do with all the interior bits that aren’t going back on the car. You can try to sell them, I prefer to get rid of them asap, give them away and if that doesn’t work unfortunately they are going to the landfill. This is carpet, door cards, underlayment for the carpet, all of that. Out and off of the car.

Now once you have removed all of the mechanical bits, and the interior, this is when I would recommend removing the wiring harness. This is not for the timid. Use some masking tape or labels and write yourself notes that you will understand later on, about where parts of the harness lay in the car and what they attach to.

1118151509a.jpg

Also, please take your time with the electrical connectors when you are unplugging things. Many connectors become a lot easier to un-latch if you actually put pressure on them, pushing them ON to the device, not pulling on them. Pulling on them often makes the latch harder to remove, so in order Push the connector on, Squeeze the tab, then pull it off. Don’t get impatient, take your time, don’t break the tabs. Electrical failures are a VERY common cause of DNF (did not finish) on amateur racing cars. Broken electrical connectors are VERY common causes to electrical failures. So while you may want to hurry it up at the moment, you will regret it if your engine dies in the middle of your fast lap of the weekend because you broke the tabs off of your coil-pack connector. Be Patient!

Now you have everything off of the car, it’s “down to the tub”, what is next? Well, now you can start really working on the chassis. You can grind, weld, scrape, and drill without worrying about damaging expensive wiring or perforating your fuel tank. This is the time when you will want to deal with rust first, then move on to cleaning up and lightening the chassis by removing sound deadening, undercoating, and seam sealer. I’ll quickly go through some methods for accomplishing these tasks. But, first, realize that you are also helping the cage builder at this point. You don’t want all of these nasty materials catching fire every time you try to weld on the car, and they will. If you don’t remove the undercoating before you try to build the cage foot boxes, that stuff is going to catch fire. Not everyone does this, but I can say that you will eventually be looking for 10 more lbs. of weight to come off of the car and there is at least 10lbs of undercoating, seam sealer, and sound deadening on most any car.

1120151637b.jpg

Undercoating and Seam Sealer: I use a tool called a Crud Thug from Snap-on to remove most of the undercoating, it’s basically a wire brush on a belt, it’s amazing, Eastwood has a version of the same tools as well, this thing will straight rip right through undercoating and seam sealer. It is air-powered, however, and it uses a LOT of air, so if you have just a small air compressor it might be time to upgrade the compressor. Yeah, still premature on buying all of those trick go fast parts, you are going to need TOOLS. Super pimp shocks are beautiful, but completely useless until you have a car ready for track set-up. Other tools that work well are an electric grinder with a heavy duty wire brush cup mounted to it, and a propane torch. Sometimes you have some material that just needs to be turned to carbon and scraped off, it’s the only way to reach it.

Sound Deadening: This is the black tar stuff that is basically glued to your floor pans and inside your doors and trunk lid and all over the place. This stuff is NASTY, and it’s heavy as hell, it’s a thick layer of tar. It’s also flammable and on the interior of your car, do you really want that riding around with you on track? There are a couple of effective methods for dealing with this stuff. Both of them involve moving the material out of it’s normal temperature range. The first method is using dry ice to get the tar really cold and make it brittle. Once you cover it with dry ice you can often just smack it with a hammer and it’ll pop off of the surface, you might need a flat blade scraper as well to get underneath it and help peel it up. The other method, and the one that I most often find myself using, is heat. I use a propane torch to warm the stuff up so that I can then get a flat scraper under it and it just peels right up. You need to not get it too hot, then it gets even more sticky and gooey and messy. It takes a little bit of experimentation to learn just the right amount of heat to make this effective, but I find this method to be the most convenient for me. You want to run the torch over the sound deadening until you just see the surface start to glisten a little bit and maybe a few bubbles. That is when it is soft enough to peel up, but not so soft that it becomes a sticky mess. The good news is, if you do get it too hot, just stop and wait for it to cool down a bit and try again.

1123151123.jpg

After you have removed sound deadening, undercoating, and seam sealer, you may need to hit some areas with primer to keep them from rusting, consider a weldable primer perhaps. But you will also want to really inspect the chassis, look for cracks in the metal, broken spot welds, and bent or damaged areas in the tub. This will also be the time to permanently close up any holes that you know you will not be using on the completed car. AC pass through holes on the firewall perhaps, extra holes in the floors and trunk area, just take a good look over the car and come up with a plan to close up these holes. I often cut out aluminum panels and rivet them into place. This helps with fire safety as well as keeping fumes and liquids away from the driver.

As you can see there is a TON of work to do and we haven’t even gotten any “race car parts” yet. Just getting the tub ready for the cage to go in. Next we can discuss the process of getting or building a cage and things that you will want to consider during this process. Do you have any questions or comments?


Read More
Cameron Conover Cameron Conover

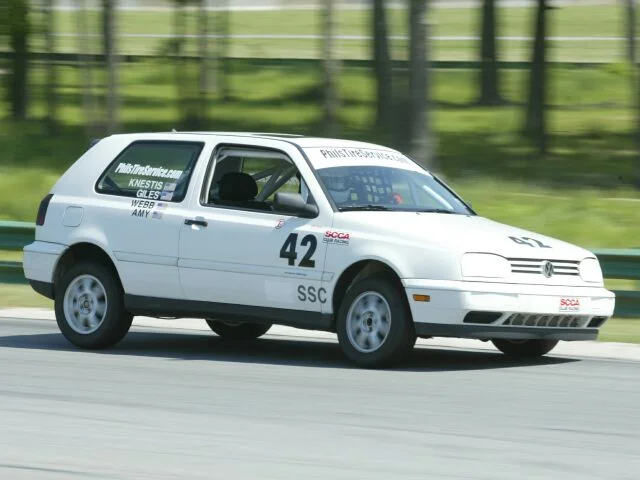
The Process, Production Based Racing Car.

The easiest thing about racing is finding the desire to do it, making it happen is another thing entirely. Common advice for aspiring competitors is to buy a ready to race car. Now, understand that “race ready” is always a fallacy. The car is never race ready, it will need something and when you really start digging around it’s probably going to need a lot, if you intend to enjoy your race events. Buying a car is not bad advice however, but it’s not for everyone. If you are like me, half of the motivation is some car or another that you’ve taken a fancy to and only that one will do. So, for whatever reason we decide that the only way to proceed is to build ourselves a race car. Great, that’s settled now.

The single most common mistake that new competitors make when they decide to build a race car is that they make a lot of assumptions about what parts race cars need and they start buying the parts they think they are going to need right away, sometimes even before they have acquired the car. Put the plastic on ice for a minute and hear me out on this one. If your desire is to go wheel to wheel racing, the very first thing you need to pick out for your car will be the class letters you’ll slap on the door. You need to figure out where your car will fit in and what you can afford to do. WHY? I just want to buy that badass billet intake manifold that all the posts are about on the make model FB page, obviously I’ll need that for the race car, it adds 10HP! Must have!

A lot of people enjoy racing cars like the ones they drive on the street, and not everyone fits comfortably in tiny convertibles.

A lot of people enjoy racing cars like the ones they drive on the street, and not everyone fits comfortably in tiny convertibles.


Not so fast. You have picked your car, you’ve decided that you want to build it from scratch. You can’t draw a map until you know the destination. Many classes for production based cars in wheel to wheel sprint racing have restrictions on what parts you can change from stock. A few of them are very restrictive, some are less so. Generally speaking, the more restrictive the rules are, the more affordable the racing is. Arms races are expensive. In SCCA you can run just about anything you want in STU, but in order to do so competitively, you’ll be really throwing money down the chute.

So find your class and find out what is allowed. Go to some races and watch the competition and the race groups in your area. Talk to some of the competitors that are already racing in the class you want to enter, make sure it’s for you. Then pour over the rules. Then ask more questions, and get a good understanding of where you are headed.

Another reason that you shouldn’t just go off half cocked on the shopping spree, I can guarantee you that for the first year of your racing, the part that holds you back the most will be your brain. Save your money for entry fees and seat time. You need to tune the driver up, so put your resources toward that.

Next let’s talk about what we do once we’ve picked the car and the class. What’s first on the to-do list?

Read More
Cameron Conover Cameron Conover

Racing a MK5 Rabbit, Drive Belt issues

07k drive belt.JPG

I started building this MK5 Rabbit for road racing in 2016. I’ve learned a few things over the years that I’ve been running it on track so far. The five cylinder engine, 07K, presents a challenge or two, we have some considerations to take when dealing with ABS and TC, and then there is the question of gearing and tire selection. I will be addressing some of these issues in the next few blog posts, hopefully some of my experience with the car will help get others on track avoiding some of the problems I had.

The first issue is the belt drive system on the 07K 5cyl engine. You can find plenty of discussion regarding the belt set up online, but not all of it is really relevant to what we do in road racing. There is a known issue with the main drive belt system, what is commonly known is that when the engine is utilized in a high demand situation, consistently run at higher RPM’s, the main drive belt will come off. The way the belt drive is set up on these cars is unique and a bit infuriating, but not something we can’t deal with. If you take a close look at the image above we can start to understand the problem with this system. As you can see there is one belt that drives from the crankshaft pulley. This main belt only drives the AC compressor, then the AC compressor has an additional pulley behind the main belt on which another belt is driven that runs the alternator and more importantly the water pump. When the main belt leaves, you run a significant risk of overheating due to the loss of drive to the waterpump. This has actually happened to me.

In the video to the right, at the 9:25 mark you can see the belt actually come off the car and in the rear camera flopping around on track, and of course the subsequent overheating.

You will find various opinions for a solution online, including the suggestion to update to a TTRS main crank pulley and tensioner. But, I have found something that works really well for me so that is what I will suggest as a solution here. I am using one of the commonly available under-drive crank pulleys. You can often find these used for a steal online because they have fallen out of fashion with the street tuner crowd. When added into the system on their own, they really do not help the belt problem, you need the complete solution. What I have found is that the belt gets harmonics in it at higher RPM, these harmonics cause the belt tensioner to bounce up and down so the belt tension is not consistent which accelerates wear on the belt and eventually causes the belt to shred itself and come off of the pulleys, this has happened to me twice, the first time the engine overheated on track, after that I set up my RaceCapture Pro3 data system to alert me when the coolant temperature started to rise and/or the battery voltage started to drop, that strategy helped save the 2nd engine. But, ultimately what we want to save is track time, no one wants to end a session early or get a DNF because of a drive belt coming off. My solution, remove the offending part, which is the tensioner. I remembered this strategy from the TDI cup days, on the TDI cup cars the accessories were removed and the alternator was run from a belt which only ran on the crankshaft and alternator, no tensioner. So what I did was to remove the tensioner and find a belt which runs tight on just the crankshaft and the AC compressor. This has solved the problem for me. In order to install this belt you need to remove the 2nd belt from the alternator and water pump on top to take the tension off of it, then you remove the 3 bolts which retain the AC compressor to the sub-frame bracket on the engine. Leave the 2nd belt in place on the AC compressor pulley and install the shorter belt around the crankshaft pulley and AC compressor, then re-install the bolts for the AC compressor. The act of bolting the AC compressor to back onto the engine is what tensions the belt. Then reinstall the belt around your accessories, and you are ready to go. This has completely cured the problem of losing the belt on the 07K for me and is a perfect solution for road racing applications. You are able to continue to use the under-drive pulley which I have found in back to back dyno testing to be worth about 4hp across the entire rev-range, and you will no longer see the belts flopping down the track in your rear video.

This solution is great for those racing on a budget or in a class that does not allow substitution of the stock water pump, etc. If you are in a more open class, or you have a much larger budget, you might consider an electric waterpump and a custom alternator bracket and alternator moved down low to run off of the crankshaft. In Improved Touring we can’t install an electric waterpump, so I am using this method to cure this issue. I would like to find a partner who can reliably supply some AC delete pulleys, that would be the next step in development for me on this aspect of the engine. Keep an eye on my blog here at raceconover.com I’ll be adding some additional insights on the platform in upcoming posts.

Read More
Cameron Conover Cameron Conover

Pre-Season Data set-up

When it comes to racing these days, technology comes in the form of data systems, cameras, engine and brake control modules, and even artificial intelligence and machine learning. There is so much to absorb, I love it.

dashpeak.JPG

If you know me you know I’ve always been a total geek for electronics. Well, not always actually. I have my brother Collins to thank for sparking that interest, which is an awesome thing. I’ve learned so much since then and the technology skills can really help open doors, so it’s been great. When it comes to racing these days, technology comes in the form of data systems, cameras, engine and brake control modules, and even artificial intelligence and machine learning. There is so much to absorb, I love it. A couple years ago I was asked what I would choose to fill the gap for entry level data systems with the departure of Traqmate from the market. I have to say, I nailed it. At that time I went all in on the products from Autosport Labs.

A RaceCapture Pro2 and an early analog version of the ShiftX being Bench tested in the Conover lab.

A RaceCapture Pro2 and an early analog version of the ShiftX being Bench tested in the Conover lab.

I first heard of these guys as a backer of their Kickstarter for the original RaceCapture system. Before they launched RaceCapture they’d already been in the automotive electronics market with a programmable electronic ignition product to convert cars over from less reliable systems. Cool, so I think that Kickstarter was back in 2013 or so, and at that time Racecapture was beyond DIY, it was deep into hacker territory to set one of those up and use the data from it; I wasn’t really ready for that, I mean, there is only so much time in a day. Fast forward three years and as I keep tabs on them I notice a bunch of development at a furious pace, pretty rad. When I was asked in 2016, “what data system now?” I said RaceCapture Pro. Even then, for the ready made culture of the Spec Miata market, RaceCapture Pro was a bit of an early adoption situation—not quite as polished as you’d want if you’re strutting around in an orange jumpsuit with a chrome wrap on your car. These days however, the Autosport Labs systems are a real market upsetter with their RaceCapture Pro3, Track, and Apex plus their full line of trick accessories.

This Custom configuration is available for $2200 installed. Image Courtesy Grant MacDonald

This Custom configuration is available for $2200 installed. Image Courtesy Grant MacDonald

I just finished fully updated installations on our two shop cars headed into the Regional SCCA race scene in the Carolinas this year. We have adopted the Tesla mindset when it comes to instrumentation inside these cars: Big expansive touch screen interfaces. I wish they could be bigger, really. What you will see here is the installation of a permanent Raspberry Pi3 with 7” touch screen in each car, alongside our traditional Fire 8 tablets, and the capstone for the driver interface is the inclusion of a CAN controlled fully programmable RGB LED shift light mounted up in the driver’s view to prompt timely stirring of the gear selector.

Hector, the Rabbit’s ShiftX2.

Hector, the Rabbit’s ShiftX2.

The Miata installation includes input accessories for the system including a wide band O2 controller, 5V analog pressure sensors for both fuel and oil, a thermocouple for the coolant, and a tap into the factory diagnostic terminal for RPM.

A shot of Grant’s Spec Miata nearing completion.

A shot of Grant’s Spec Miata nearing completion.

Inside the VW we find more modern technology than what you will see in a Miata; we have CAN data from the factory ecu and controls aboard the 2008 VW Rabbit. This gives us the ability to harvest much more data from the car, with much less installation complexity, leaving you free to use those analog inputs for more fun things than oil pressure, (not that there is a shortage of analog inputs, eight onboard and the capability to expand with the analogX accessory). So you will see much more data being displayed here than you will find spewing forth from a Miata ecu.

The final big difference you’ll find in the VW is that the actual RaceCapture itself is the upgraded unit with the available sim card slot and I’ll be streaming everything to Podium.live during each session: https://podium.live/events/march-into-spring-vir-ncrscca/device/conover-motorsports-42 We will be racing the car and streaming each session live to the cloud. You will be able to see each channel being logged live as well as the car circulating on the track map of VIR, and all of the laptimes and predictive laptimes as well. I hope I see you in the paddock though; don’t sit at home, come on out and check out the local race scene!

podium.JPG
Read More
Cameron Conover Cameron Conover

The beginning

It all started around 2002 or so, when I reconnected with an old high school buddy that knew a guy who was running a MK1 Rabbit in SCCA Club Rally. We did that for a bit, and not long into that exercise I met Kirk Knestis in much the same way, the internet friends of friends and so on. Kirk wanted to build a car to run Showroom Stock, and then it morphed into IT and even Rally, the first Rally event was the end of that first car, I think we were in TN. So Kirk and I set out to build another identical yet improved 93 VW GTI this time specifically for Improved Touring B. Pablo was the name of the car, Pablo 2, actually sometimes Dos Pablos. Anyway, that started my long and twisted tale of SCCA road racing and my intro into SCCA enduros, we did a bunch of enduros with that car. You can read all about the evolution of both cars and our experience building them on Kirk’s website which he still maintains to this day. He documented nearly everything. We had great successes with that car, which turned into successes with many MK3 GTI’s in ITB, even swept the ARRC podium one year with all three ITB GTI’s all from the same camp, pretty cool.

Here are some pictures from those days, but please take a look over on Kirk’s site to see the entire history of Pablo and the beginnings of Conover Motorsports. http://www.it2.evaluand.com/gti/index.php

The very First VIR 13 hour with Pablo #1

The very First VIR 13 hour with Pablo #1

See more of this build at http://www.it2.evaluand.com/gti/build4.php

See more of this build at http://www.it2.evaluand.com/gti/build4.php

ARRC win in a Conover prepped and supported MK3 ITB GTI driven by Tristan Herbert.

ARRC win in a Conover prepped and supported MK3 ITB GTI driven by Tristan Herbert.

Tristan Herbert, Tom Martin, and Kirk Knestis Sweep the ITB podium at the ARRC

Tristan Herbert, Tom Martin, and Kirk Knestis Sweep the ITB podium at the ARRC

The drivers and crew after a 1st place finish at the 24 hour race Longest Day at Nelson Ledges in 2007.

The drivers and crew after a 1st place finish at the 24 hour race Longest Day at Nelson Ledges in 2007.

Read More